

DIY: An Upcycling Tutorial
As you’ve undoubtedly noticed by now, I like buying custom pieces for my dioramas because I find they add a dash of realism to Eve’s world, while simultaneously offering a little support to the skilled artisans that create them. That being said, custom pieces, or even pieces that don’t rely heavily on plastic, can be quite expensive.
For those that prefer to be a bit more frugal, you can transform your generic, plastic pieces with a quick, budget-friendly makeover. The items I’m up-cycling in this post are all small, but this method works with larger furniture pieces as well (which I’ll do at some point, when the condo isn’t in chaos – no, they’re still not done with our living room and yes, that was me drawing on my real life…)

What you need:
* Cardboard for your work surface. It’s easy to transport, without having to lift each individual item.
* Paper towels or fiber cloth. Toilet or tissue paper won’t work, you’ll end up with it stuck to your newly painted surfaces as it rips into little shreds.
* Large nail file
* Wire cutters or an xacto knife. Both work, but I’m clumsy and feel more comfortable with clippers.
* Acrylic paint in the colors you want for your finished product. I used black and bronze gloss. You can also use oil, but it takes longer to dry.
* Two paint brushes. Smaller areas or areas that need more detail will need a smaller brush.
* Plastic or latex gloves. I’m a very messy painter.
* Glossy varnish. I got a spray can as I find it’s easier to work with.
* An open outdoor area for things to dry. You do not want to be in the same room as drying varnish.
* A face mask. You don’t want breathe the fumes from the varnish.
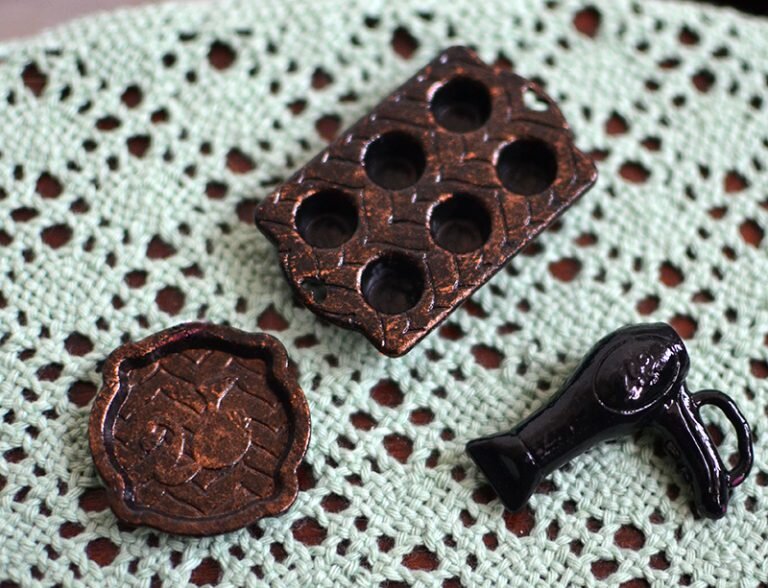
For today’s upcycle, I started with a grey, matte muffin tin, a “Barbie pink” plate, and an equally pink hair dryer.


Both the muffin tin and the plate had some kind of plastic protruding from them, I assume this is to hold them in position in official Barbie dioramas, or perhaps allow them to be held by dolls more easily. Whatever the case, I’m not a fan, so I removed them. I used the clippers, but I had to be gentle to avoid cracking the items. Once the larger chunks were removed, I smoothed over the rough area with the nail file. This is going to cause little plastic bits to cling all over your items, just rinse them and let them dry before continuing.
The next step was where things got really messy; I gave the items a once over on one side with the black, acrylic gloss and set them aside to dry. For my particular brand of paint it takes about fifteen minutes for them to be all set; not all brands are the same, so be sure to check your container. Once dried, I could see how uneven the coats were, so I gave each piece a second coat, let them fully dry again, and repeated for the opposite side.

I wanted the hair dryer to remain a solid black, so I left it to the side for this next part.
My plan for the muffin tin and the plate was to age them bit, making them feel more used and antique. I dipped my second brush into the bronze gloss and wiped most of it onto a paper towel, pushing the brush down so the bristles splayed in different directions, and continued until there was very little paint left with each stroke. Then I went over each item quickly, leaving traces of the bronze. Or, the short (less crazy) way of saying it: I gave them a dry brush.
Now, if you feel there’s too much bronze, simply wipe away some of it with a dry paper towel or fiber cloth. Don’t be too rough, or you could remove more than you intend.

When I was satisfied with the appearance, keeping my gloves on, I took my cardboard to my outdoor area and put on my mask; this is where things get stinky! The instructions on my varnish may be different than yours, so be sure to read over them. If you’re also using an aerosol, I suggest a quick, light spray on one side.
I found that I needed to move them right after spraying them, otherwise they stick to the surface where they were sprayed. Moving them just an inch or so away from the sprayed area should suffice, and you want to move quickly as they’re very sticky, and will adhere to your gloves if you’re not quick enough.
Once re-positioned, leave them to dry fully. Some varnishes dry at different rates, so be sure to check your container. Once dried, repeat this step on the opposite side. If they are sticky, or cling to your gloves at all when you try to rotate them, they’re not done drying.


Once fully dry, I ran the pieces under the tap with warm water and a little hand soap. If you do this, please be gentle, otherwise you may strip off some of your makeover. As you can see with the plate (above), I was a little too rough when I rinsed it, and had to give it a slight retouch. Thankfully, it won’t be noticeable in most pictures, as I won’t be zooming in quite so much.
Overall, I’m happy with how these pieces turned out.
I “tested” this method a few other times, but didn’t think to take “before” pictures to compare them (as Homer Simpson would say: “D’oh!”).
Eve’s laptop was upgraded with two coats of black gloss paint, varnish, and a small sticker as the screen.
I debated whether or not to give the outer area a bit of bronze paint for a cool, steampunk vibe, but with the surface being mostly smooth, it probably would have just given highlights to the barbie logo. Still, a definite improvement even with just a little effort.
Even so, it’s not my favorite result.

That award goes to the pan.
I decided to take a matte, grey Barbie pan and transform it into a cast iron pan. This was incredibly easy due to the texture inside the pan, it turned out better than I thought it would. I’m pleased to say I have a lot more where this came from, and I’m going to continue playing around and testing (and, of course, keeping you in the loop)

I hope you enjoyed this little tutorial.
Did you try this, or do you have any tips for upcycling Barbie goods? Let me know in the comments below.
I’ll see you next time :)


